About

Friday, September 30, 2011

Grace Bonney - Love Her

To say my plate is full lately would be an understatement.  I'm probably no different from many of you out there with your days packed and your evenings are filled running around with kids or with friends.  This week has been filled with activity every night so I've had little time to write, let alone sleep and keep up with the on-going to do list at home. 

(via latimes.com)

Nonetheless, I was able to sneak out this evening and go to the Design Sponge at Home Book Signing Event at my local Anthropologie.  My 30 second chat with Grace Bonney was inspiring.  She, like other "big bloggers" I've met was so gracious and unassuming.  She's just like the girl next door who you'd love to gab with and go shopping with. It's amazing that she started the #1 design blog in the world!  I was telling my husband she's like the Steve Jobs of the design blog world.  ( I tried to put it in terms he could understand.)  :)

Sitting in bed and reading her blogging story in her book was so inspiring.  Her story is no different from mine or maybe many of yours.  You're drawn to blogs or write a blog because you simply want an outlet for your passion and you probably don't even care if people read it, it's gravy if they do.  That's what I love about the blog world.  It's so organic how it comes together and it's accessible to everyone.  You just have real people, doing and seeing fabulous things, and at the end of the day... it's really just someone sharing their heart and joy as they tap away on their computer (most of the times in the wee hours of the night). 

Read more about Grace here through an article on Houzz. 

Hope you find some time this weekend
to do something that makes your heart sing.  :)

See you Monday!

Tuesday, September 27, 2011

An Inspiration Board - Modern Retro in B & W

Happy Tuesday... I'm just going to keep rolling with the B&W theme this week.

I put together this inpiration board for my cousin who moved into a new apartment in Vancouver BC.  He wanted a clean, retro, but modern feel.  Modern with some warmth.  So here's what I came up with. 

What I love most about this board is that it shows how a room in black and white can still be interesting, have character and feel inviting.  A neutral color palette does not have to mean boring.  The key is having a variety of textures and patterns.  I tried to combine sleek shiny surfaces with pieces that were more rough and weathered. 


1.  IKEA Barometer Floor Lamp
2.  IKEA Kulla Table Lamp
3.  IKEA Bild Art Print
4.  West Elm Throw Pillows
5.  Sac Couch  ( Had this already, built room around this piece)
6.  IKEA Barometer Table Lamp
7.  CB2 Tux Coffee Table
8.  IKEA Stockholm Rand Rug
9.  West Elm Raw Edge Media Console
10.  West Elm Ikat Ogee Linen Panels
11.  Etsy NYC Grand Central Station Print
12.  CB2 Gear Console Table

All pieces are fairly affordable and easily accessible.  :)

Sunday, September 25, 2011

Black is Back - I'm Inspired

Happy Monday!  It seems everywhere I look these days, I'm seeing black in interiors and I'm loving it.  Especially in kitchens!  I looked through my inpiration photos on my computer and was amazed at how many of them have black cabinets or black framed windows and doors.  Here's what I mean:


(Tyler Florence Kitchen of the Year via housebeautiful.com)


(Kitchen by Tommy Smythe via houseandhome.com)


(House and Home 2010 Showhome Kitchen via houseandhome.com)

Tons of black and white in Nate Berkus' new NYC apartment, check out the video tour in this link(sorry, couldn't find a pic, but had to share!)


(Nate's previous NYC apartment via escapadeblog.com)

Lastly, just by chance, I flipped through some old House and Home mags and found this photo from its Oct. 2010 issue.  LOVE the black framed glass cabinets! 

( via houseandhome.com)

Now the real question is.. .will I have the guts to do the same to my white cabinets that are perfectly fine?


I can risk painting $5 thrift store chairs, but this takes real confidence and commitment.  I know I'd love the finished product, but... not sure how to best execute it.  Any tips?  Have you painted your kitchen cabinets? 


Thursday, September 22, 2011

IKEA Friday - MANLAND

I just heard about this and knew I HAD to post this on IKEA Friday.  Most of you are familiar with Smaland for kids right?  The play area at IKEA.  Well, in one IKEA store in Australia, they've put together a Manland for men.  Seriously.  A lounge with video games, tvs and a place for them to hang while the women shop.  There seems to be mixed feelings about this. 


( via theweek.com)

My personal take... I guess the 30 minute buzzers to pick up your man might be a little degrating, but overall, how different is this than the tvs they put next to dressing rooms at department stores?  I guess, if a guy has to go to IKEA, and he doesn't like it, why not give him another option.  :)

Click here to read more and see a video

What do you think?

Tuesday, September 20, 2011

Going to Design Sponge in Seattle!


I'm excited to be going to the Design Sponge Craft and Book Signing Event next Thursday here in Seattle.  I was on the waitlist and just found out I got in!  I can't wait to get my hands on the book, make my own wax seal, meet some fabulous peeps and be inspired by all the creativity that I'm sure will just be oozing from this event. 

Will you be there too?  Click on this link to be added to the waitlist.  Let me know!  :)

Monday, September 19, 2011

Pier 1 Finds - Mirrors!

Here's part 2 of my post from yesterday - My favorite wall mirrors from Pier 1.  There's really some great stuff, especially the items on clearance.  If you're in the market for a mirror,  I hope you find something that works for you!


Mosaic Mirror, $199.  I'm seeing this in a powder bath
or a pair in a master bath.  I love the sparkle and shot of glam
it would give to any room.
 
Window Mirror on clearance for $99.  This one is a steal!
 Pottery Barn's Eagan Multipanel Mirror is similiar and is $699.
This would be great on its own or layered on a mantel.

Here's another show stopper at a great price! 
Venetian Dots Mirror on clearance for $99.
 Z Gallerie's Simone mirror is very similiar, but smaller and sells for $199.

Capiz Mirror, on sale for $159.  This one might be my favorite. 
I always love the contrast between lights and darks
and the graphic pattern on this mirror is stunning.


Here's the capiz mirror featured in a room designed by Caitlin Creer Interiors
Love it even more now!
 

Sunday, September 18, 2011

Pier 1 Finds - Lamps

Happy Monday!  I had a full weekend with lots of great visiting with old friends.  There is something extra special about old friendships and people that have seen you through many seasons of life.  I just wish I had another day or two to catch up on some rest too!  Alas.. another week.  :)

Speaking of old friends, I feel like I've been reintroduced to an old design friend, Pier 1 Imports.  I remember loving Pier 1 back in high school and college and always wanting one of their cool director chairs or their cozy papasan chairs.  Pier 1's style is probably more ornate than my typical style, but it's a great resource for great accent pieces that add glam and sparkle to your classic/traditional basics.  Not to mention, great prices!

Today I'm posting some of my favorite lamps from Pier 1 and tomorrow, I'll be posting about some great wall mirror finds!   


Gold Leaf Glass Lamp. 
A pair of these would add pizazz to any room.  The inside of the shade is gold leafed and is gorgeous!  Not bad for $125.  The shade also comes as a chandelier too!


Glass Candlestick Buffet Lamp.  I love the modern elegance of this lamp.  $125


Rosette Hayworth Lamp.  So much detail and could be so sweet in a girls room.  $99.

Serena Table Lamp.  This one will never go out of style.  Fabulous at $99. 
Want more style?  Just add ribbon to the top and bottom of the shade.  I'm seeing black or navy.

Have a great week and check back tomorrow for more goodies from Pier 1.


Thursday, September 15, 2011

IKEA Fridays - Meet ARYD

After all the painting I did a couple of weeks ago, I'm even more convinced that anything can be given new life or personality with a simple coat of paint.

For example, the ARYD Candle Holders which range in price from $7.99 - $14.99 could really be transformed into something oh so chic.  I love how substantial they are and its gorgeous curves.


They could easily look like these Chroma Candle Holders from Anthropologie, but even better.  The Chroma goes for $28.00 each and I actually like ARYD better with its chunkiness and you can group them with varied heights and widths. 


Painting these would be so easy using sample pots like these from Benjamin Moore. 
(I have a least a dozen of these laying around)


Or a good ol' can of spray paint. 


Hope this inspires you to create something fabulous!

See you Monday!

Tuesday, September 13, 2011

Did you go to Target?

If you went today in hopes of snatching up some of the fabulous items from the Missoni line, then you probably saw something like this:


I was surprised to see that in just a few hours, most of the shelves were bare!  I knew the Missoni line was going to popular, but I had no idea the store would practically be cleaned out in just a few hours.  I happen to have some time this morning and I was just curious to see the items in person. 

Target's website has been down all day too.  Amazing.  Here's an article about it from the New York Times

I managed to grab just a couple of items for my little girl.  Were you able to get anything you've been eyeing?


Monday, September 12, 2011

Let School Begin

the door to our classrom/playroom

Tomorrow will be the first day of school for my 2 boys, Micah and Ryan.  One will be back at preschool and I will be starting our very first day of Kindergarten at home with Micah.  Yes, we're diving into homeschooling!  (I may share later about our journey in making this decision to homeschool.) I write this post with excitement and trepidation.  It's a privilege to be able to start this new season of teaching my own kids after 10 years of teaching other kids.   I look forward to all the aha moments and special times of guiding their learning and shaping their character.  Will this be hard?  YES!  Is it hard not doing what everyone else is doing?  YES.  I'm not sure as to how this will all pan out.  I have a feeling this will be a year filled with many lessons on trust, humbleness, grace and patience and seeking wisdom beyond my own understanding... I wonder who's going to be learning more this year?  :) 

My reading material for the past week has been more this:


than this:


I hope to be able to continue to share this new adventure with you as part of this blog AND continue to carve out time for my love of interior design too.  God's wired me a certain way and I hope to be able to continue to live out the passions that's He's given me.  I truly find joy and purpose in sharing my musings and inspirations with you and it's so rewarding to know that I might be inspiring a few of you out there to live a bit more beautifully.   However... don't be suprised if my posts this week are a bit sparse.  :)

So tomorrow morning, we'll start our day off with a robust breakfast of green eggs and ham and then we're off!  Wish us luck!  :)

Friday, September 9, 2011

Keep Your Head Up

I have to admit, last week kicked my butt.  Amidst all of my painting and redecorating, I was feeling overwhelmed with projects, life, kids and sad to say, found myself in a pretty sour mood.  Life can kind of do that from time to time right?  I heard this song, and it gave me just the pick up that I needed.  I love how music can do that!  :)    This is my current fave song! 


Oh oh... yeah.. yeah... :)

And... he's coming to Seattle next month!  Woohoo!

Thursday, September 8, 2011

Painting Chairs... My Tips and Tricks

I'm by no means an expert in painting furniture, but I have gotten better with each project and I definitely learn something new everytime.  Here are some things I learned this time around:

Tip 1:  PRIME!  PRIME!  PRIME! 

This is a step not be skip or scrimp on.  Apply 2 coats to give your paint a great base to adhere to.  It'll save you lots of repainting later on.  My other dining chairs were IKEA laminate and I primed and painted them and they look great.  I use KILZ and it seems to do the trick.


Tip 2:  Foam Brushes are Fabulous! 

I've always disliked cleaning brushes.  No matter how much I rinse them, they never get as clean as I'd like them to be.  This time, I primarily used foam brushes and they worked great!  I got mine from the hardware store, not sure if these are more durable than the craft ones.  They were only 79 cents each!  They spread the paint really well, with minimal brush strokes and I feel fine just tossing them when I'm done.


Tip 3:  Plastic Wrap is your Friend! 

Between coats I used to spend lots of time rinsing out my brush only to start over in a few hours or the next day.  It was a tedious step.  I've seen other people wrap their trays and brushes with plastic wrap and it stays moist and ready to use for the next application.  You can save the thorough clean up till you're done with the whole project!  It really works, I saved my primer in a tray for about a week and still worked great.  It was so nice not to rinse brushes between coats.


Tip 4:  Don't forget the Polycrylic Finish. 

It creates a nice smooth finish and protects all your hardwork.  Much like primer, it's a step that pays off to not skip.  You need to be careful when you apply poly, it is quite viscous so it's easy to get drips, yet you want to load up your brush enough so that you're not going back and forth on your piece which causes brush strokes.  Only practice makes perfect, you'll end up finding that perfect balance of a lightly loaded brush and be on the look out for smoothing out any drips before it dries.  I liken it to driving a stick.  I attempted to learn, but couldn't find that sweet spot between the accelerator and the clutch. 


I usually started like this to paint the underside and the legs.

There you have it.  A few small things that have worked for me.  Repainting what you already have can give new life to your furniture without spending very much money.  If you're scared, buy something at a thrift store and just give it a try.  I painted my chairs over 2 nights.  1 night for priming and painting.  2nd night for the poly.  It's totally doable!


Then I flipped them like this to paint the top half.


Tuesday, September 6, 2011

Kitchen Chairs - The Reveal


Has the suspense been killing you?  Have you been staying up at night wondering if I went with white or green?  :)  Well I put in some over time decorating hours this past weekend and the chairs are now done!

Last Friday I posted pics of these thrift store chairs in a rather sad state. 


Here they are today.


I'm very happy with them!  Such a great shot of color and it's such a happy green.  I went with Lemongrass by Behr at Home Depot.


Not too far off from my inspiration pic:


(via tilthrestaurant.com)

It's funny, I went to this restaurant last year and the food was good, but what really stuck with me, was how much I loved their lovely green chairs.  Clearly, you know which of my 5 senses are more attuned. 

I'll be sharing more pics tomorrow documenting the process and some of the tricks I picked up while painting.

Last, but certainly not least, thank you so much to everyone who gave me feedback through a comment, email, text.  It was so fun to hear from so many of you!  Green was by far the most popular choice and it gave me the confidence to go for it.  Painting with bold colors is scary, even for me! 

This got me thinking... wouldn't it be fun AND helpful to be able to send me pics if you're in a design dilemma and I can post them and have people comment and give feedback.  I could see it as a regular column?  Sound fun?  Well... if you have a design dilemma, send me a pic and we'll see what happens!  :) 

I think that's the beauty of developing a great online community through blogging, being able to help and encourage each other to solve problems and live better.

picketfencedesign@gmail.com

:)
 

Friday, September 2, 2011

Chairs... Oh What To Do

I'm interrupting our regularly scheduled post, because I need some help as to what do with these chairs.  :)


I bought these at a thrift store last week for $5.00 each.  I'm making over our old breakfast nook chairs to be used in our dining room and these will become our new nook chairs.  Pretty simple, well constructed with a bistro sort of feel.  They're all primed and I'm stuck as to how to paint them.

Here's our kitchen and here's what I'm thinking...


OPTION 1: 
Paint them a bright green color like here. 


(via tilthrestaurant.com)


OPTION 2: 
 Paint it white and keep it simple like here:


(images via houseandhome.com)

OPTION 3: 
Paint it white and add some vertical mocha stripes so that it would relate to this:


and this:


What do you think? 
I'd love to hear your thoughts on this one! 
Leave me a comment. 


Thursday, September 1, 2011

Another DIY: O'verlays and my IKEA dresser.

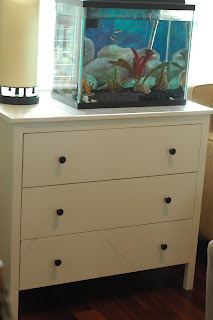
Ok.  So excited to share with you a fun project I did last week.  Remember when wrote about O'verlays a couple of weeks ago?  Well, I got my pieces and finally got a chance to use them!  I used them on my IKEA KOPPANG dresser.  Very similliar to the HEMNES dresser, but about $50 cheaper.

Here's how it all went down.

BEFORE:


My O'verlays arrived beatifully wrapped in this blue tissue. Can't wait to get started!  :)


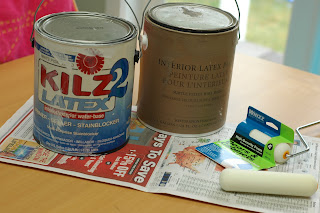
Here's my arsenal.  Primer, paint and small roller brush. 
I refreshed my furniture painting technique by looking here


Just finished STEP ONE: primer. 


STEP TWO:  Paint


1/2 way there!


STEP THREE:  Position and attach O'verlays


AFTER
And voila!  I simply attached the O'verlays with the double stick tape they included and used a level to make sure I got them on straight.  Very easy!


A fun upgrade don't you think?


A couple of thoughts on O'verlays.  Love them!  So easy to use and reasonably priced at less than $20 a panel.  White on white looks fabulous, so you don't even need to paint if you're putting it on a white piece.  Adding them on a mirrored surface would be oh so fabulous too.

Such an easy way to add instant graphic pop, and your own personality and character to an otherwise generic piece.  I'd love to hear if you're inspired to do your own O'verlay makeover!


LinkWithin

Related Posts Plugin for WordPress, Blogger...